The biggest way to up your hot sauce game is to learn how to ferment hot peppers. During fermentation, tiny microorganisms break down larger compounds into more flavourful smaller compounds. Thus, producing new flavours altogether and enhancing some of the existing flavours of the hot peppers.
Fermentation may sound scary but it is in fact really easy to do.
In short, this is how to ferment hot peppers for hot sauce:
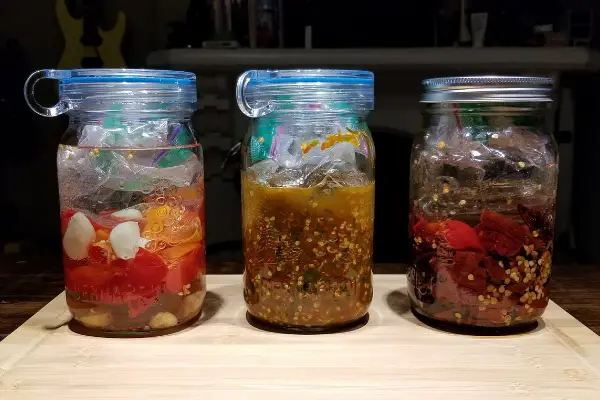
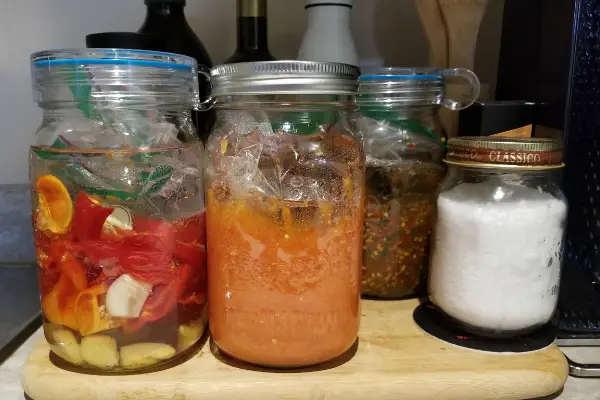
Place hot peppers in a clean mason jar or similar vessel. Create a salt brine of at least 2.5-5% salt content and pour just enough brine to cover the hot peppers. Weigh down the peppers to help keep them under the brine, sometimes they can float. Rest the jar out of direct sunlight for 1 to 2 weeks, or however long you want.
Let’s explore this process in a bit more detail. Also, there is an awesome Fermented Mango Habanero recipe at the bottom of this article so you can try fermenting at home!
What Is Fermentation?
Fermentation is the process of microorganisms breaking down substances like carbohydrates into acids or alcohol. It is also a method of preserving peppers and other foods.
When we ferment hot peppers to make hot sauce we are using what is called lacto-fermentation. Also known as Lactic Acid Bacteria (LAB) Fermentation.
On the outside of each pepper, there are lactic acid bacteria. These bacteria, when introduced to an anaerobic environment begin to break down carbohydrates into lactic acid.
When fermentation occurs, both lactic acid and carbon dioxide are produced. The creation of carbon dioxide will create bubbles, which is a tell-tale sign that the fermentation process is happening. Together, the carbon dioxide and the lactic acid create a bubbly and tangy taste.
Not only is there a boost in flavour, but there is also a boost in health benefits when fermenting hot peppers. Probiotics live on the surface of peppers and other vegetables and fermentation creates the perfect environment for those probiotics to multiply.
Fermented peppers also come “pre-digested” which means the enzymes in your stomach will have to work less to digest the carbohydrates in the pepper.
In order for LAB fermentation to occur, the peppers need to be in an anaerobic environment. This is where brine is introduced. The brine is a salt/water solution that creates the perfect environment for lactic acid to be produced.
Is Fermenting Hot Peppers Safe?
Yes! Although the process of fermenting hot peppers may seem daunting at first, it is actually quite easy.
As the lactic acid bacteria rearranges carbohydrates, harmful bacteria and mold are actually killed off in the process. Of course, use some common sense, if something smells off or tastes off, it might be off.
If you see any fuzzy mold growing on top, it might not be safe to enjoy the peppers below the brine. If the pepper starts to look rotten or discolored in a bad way then maybe don’t eat them.
To help prevent mold and other baddies from growing, it is important to make sure your tools and vessels for fermenting hot sauce are clean and sanitized.
Also, it is important to make sure the peppers and other ingredients in your brine stay below the water level. Just remember: “Below the brine, you’ll be just fine”.
Get Your Exclusive Spicy Gear!
T-Shirts

Aprons
Notebooks
Why Ferment Hot Peppers?
There are two reasons why you should try fermenting hot sauce.
The first reason is that fermentation extracts many more flavours from hot peppers. Fermentation breaks down the carbs which in turn introduce new tastes and flavours. The taste and aroma of the other add-ons that you ferment with your hot peppers are also present after fermentation.
The second reason is the health benefits. Lacto-fermenting anything increases the number of probiotic bacteria that are found within the foods. Most vegetables have probiotics growing on the inside of them anyways but when you ferment them and put them in an anaerobic environment you give them the perfect place to thrive and reproduce.
A bonus health benefit is that fermentation pre-digests the compounds in carbohydrates found within the vegetables or the hot peppers. This makes it much easier for your stomach enzymes to break down the carbohydrates when they enter your stomach. We are born with a finite number of enzymes so any extra help that they can get breaking down food that we put in the rest of it is much appreciated.
Fermented Hot Sauce Versus Vinegar-Based Hot Sauce
When it comes to comparing vinegar-based hot sauces with fermented hot sauces, there are a few key differences.
Vinegar-based hot sauces usually use much fresher ingredients and as such require more vinegar to be used as a preservative in the hot sauce leaving a more vinegar flavour.
Whereas fermented hot sauces may still need a bit of vinegar to help stabilize the sauce, they won’t need as much which means a less acidic flavour.
What Peppers To Use In Your Ferments
When it comes to choosing which Peppers you want to ferment it really depends on which recipe you are making or what you have available. If you grow hot peppers in your own garden you can use those in ferments or if you buy your hot peppers from a grocery store you can also use them.
It is possible to ferment dried peppers you just might need to kick-start the mix a bit with a little bit of leftover brine from a previous ferment. If you don’t have leftover brine you should add some fresh ingredients like garlic, ginger, or fresh peppers. Anything to kick-start the fermentation process. A little bit of yogurt sometimes helps as it has many of the probiotics and bacteria needed to start fermentation.
That being said there are a few characteristics of peppers that you should consider when choosing which Peppers you want to ferment.
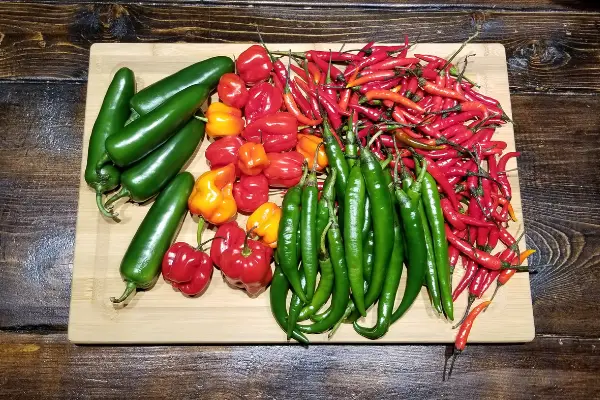
Heat Level
How hot do you want your hot sauce to be? For a lot of heat, use mostly super hots like habaneros or ghost peppers. If you’re a fan of mild peppers, go with a Jalapeno or a Serrano pepper.
Balancing the heat level really takes experience with the peppers you are using. If you don’t know how hot the peppers are, you might be surprised, or delighted, with the heat level in your ferments.
This is a good opportunity to talk about the pith and the seeds of hot peppers. Many people think the heat comes from the seeds. This leads to many hot sauce makers adding too many seeds to their sauce. Too many seeds can give the sauce a woody/earthy texture which is undesirable. At least for me.
In fact, capsaicin, the compound responsible for the burn is found primarily in the pith or ribs of the pepper. So if you are trying to make a spicy sauce, it is a good idea to include the pith and ribs. You should keep in mind that any white-colored pith can taste bitter. Adding too much of the white pith might make your hot sauce taste bitter.
The Thickness of the Skin and Wall
Skin thickness is important to consider when choosing peppers for your hot sauces. Thick-skinned peppers tend to be more difficult to break down in the blender. This can sometimes produce an unpleasant texture, it may require a lot of blending to become smooth.
Thin-skinned peppers are easy to break down and tend to produce a smoother sauce with minimal blending.
The thickness of the flesh or wall of the pepper plays a strong role in the texture of hot sauce as well. Thick-walled peppers tend to have higher water content. You would think this would make for a thinner hot sauce. However, thick-walled peppers tend to have higher pectin content. When released via blending, the pectin thickens up the sauce, leading to a smoother hot sauce.
When it comes to fermenting, there is a difference between thin and thick-walled peppers. Thin-walled peppers are better fermented with brine. This is because there is less water content in the thin-walled peppers. When you blend thin-walled peppers the mash will end up pretty dry and might not ferment properly without any added brine.
Thick-walled peppers on the other hand would be good candidates if fermenting a mash. The salt has more moisture to pull out of the thick-walled peppers leading to a wetter mash. This can make it easier to ensure the peppers are submerged in the brine created by the peppers and salt.
How Does The Pepper Taste?
The wonderful thing about peppers is that they all taste different. Habanero peppers have a fruity and tropical taste. Jalapenos are a little sweet with a sharp spice. Each pepper has its own flavour profile.
Understanding how each pepper tastes will make you a pro at selecting peppers for your ferments.
You should also understand how the maturity of the pepper pod impacts the flavour. Unripe peppers can have a bitter taste if picked too early, this could potentially ruin a hot sauce.
How To Ferment Hot Peppers
Alright, now that we’ve talked about what fermentation is, let’s learn how to apply that knowledge to make some delicious hot peppers.
Step 1: Brine or Mash
Depending on the hot sauce recipe you are making, you will need to ferment your peppers using either a brine or a mash. Both follow the same idea of using an anaerobic environment to break down the peppers.
The type of fermentation usually depends on the recipe or the type of peppers used in the hot sauce.
Let’s take a look at what each type of fermenting is.
Salt Brine Fermenting
Salt brine fermentation sometimes called wet fermenting, involves submerging the hot peppers in a salt brine. The salt brine should be somewhere between 2-5% for best fermentation. The brine should be made with filtered water to help reduce bad bacteria as well as chemicals like chlorine which can inhibit the fermentation process.
The type of salt used in the brine matters as well. You should not use iodized salt. The iodine can slow down the growth of the bacteria needed for the fermentation process.
Making a brine for fermenting is easy.
- Determine how much brine you will need to make to fully submerge your peppers. I usually use mason jars for fermenting, so I will usually make enough brine to fill the entire mason jar. Let’s say we need 1 Litre of brine to create an anaerobic environment for the hot peppers.
- The next step is to determine how much salt we will need to create a 5% brine. Well, we have 1000mL of water and 5% of 1000mL is 50mL. So how do we measure 50mL of salt if salt is measured in grams? As a general rule, 1mL of water is equal to 1g so we can convert 50mL to 50g.
- Mix the 50g of salt with the filtered water in the mason jar. Stir the mixture with a spoon until the salt is dissolved. Now the mixture should be a little cloudy and spinning, let it sit until it is clear again and still.
- The brine is now ready to use.
The salt brine can then be used to cover your hot peppers in another mason jar. More on that below.
Pepper Mash Fermenting
I found this method of fermenting really interesting. Mostly because it reminds me of finishing concrete.
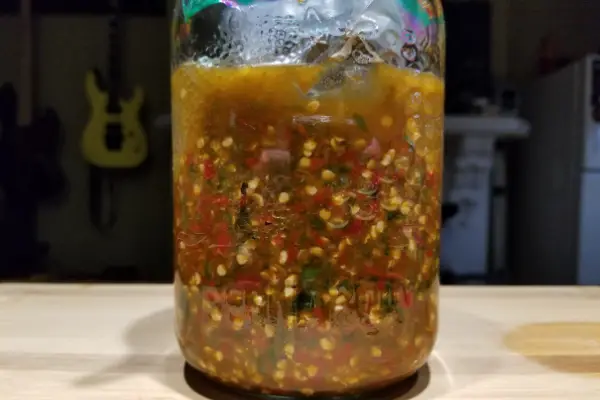
Creating a pepper mash, sometimes called dry fermenting, involves blending hot peppers into a mash and adding salt. The salt pulls the moisture out of the pepper flesh and creates a brine. The mash is then added to a jar and the solids are tamped down until the liquid is sitting on top and covering the solids.
Just like how when finishing concrete you tamp down the aggregate and smooth out the fine particles for a smooth finish.
One of the downsides I have found to this method is that the mash is more susceptible to mold over the course of the ferment. Because the pepper solids are sitting much closer to the top there is more chance of some solids rising to the top. Especially if you are using fermentation weights or a Ziploc bag to weigh down the solids.
Making The Mash
Here is how to make a hot pepper mash for fermenting:
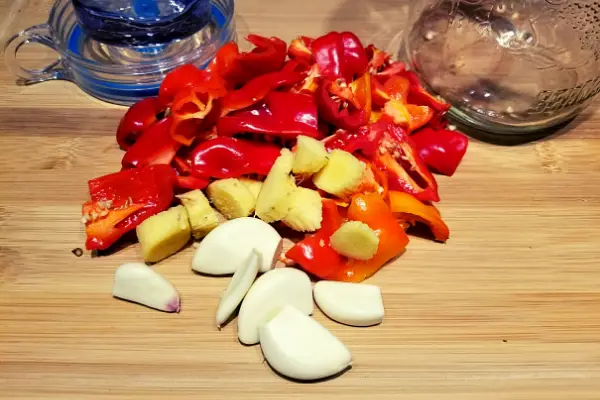
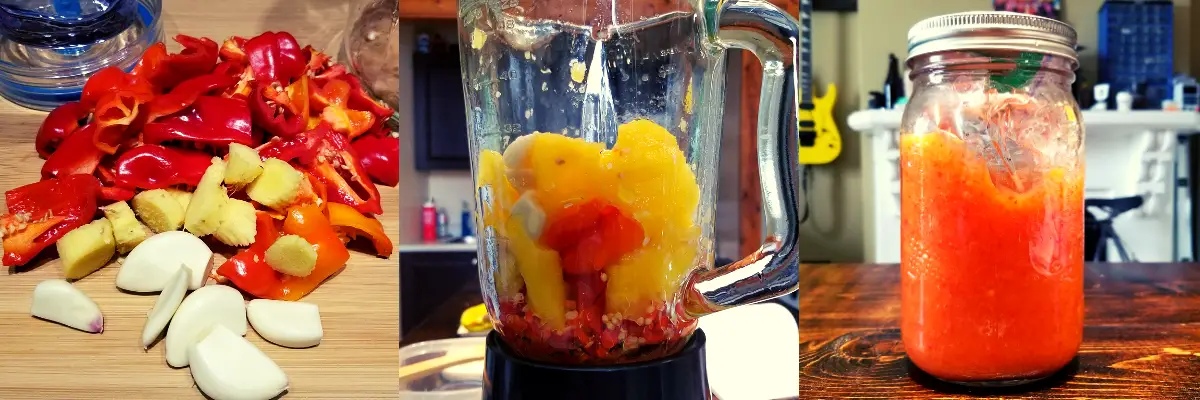
- Chop the tops from all of your hot peppers and prepare any other ingredients you will add to the ferment. Depending on the type of peppers you use, you may need to cut them into smaller pieces. Make sure you wash everything that will go into the pepper mash, this helps keep bad bacteria out of the mash.
- Blend the peppers and additional ingredients in a blender until they are chopped up into what looks like a mash (see photo below).
- Add your salt to the pepper mash, you should use about 2 teaspoons (8g) of salt per cup of pepper mash. Your blender should have measurements on the side for easy measuring. With the salt added, continue blending the pepper mash and let it sit for a bit. The mash should start to become a little wetter because the salt is pulling moisture from the pepper flesh.
- After giving the mash some time to pull the moisture, transfer it from the blender to the mason jar and give it a stir.
- Now that the mash is in the jar, pat it down until the liquid rises to the top. There should be enough liquid to cover the solids, if not make a little bit of brine just to ensure the top is covered. Keep some of the brine around as it tends to sink into the mash.
There you have it, that is how you make a pepper mash. It is important to note again that thin-walled peppers will not be the best for creating a mash as they have a low moisture content. Peppers like Anaheim and Jalapenos tend to be great for mash fermentation.
Which Fermentation Method Is Better?
Out of both methods, I enjoyed the salt brine the best. I had more confidence in this ferment than I did in the mash. Another bonus to the salt brine is taste-testing the peppers along the way. They make excellent additions to sandwiches, especially if you cut them into rings pre-fermentation.
Speaking of cutting up peppers…
Step 2: Prepping Your Peppers
The next step is to prepare your hot peppers for the fermentation process.
Note: I feel like I should mention that working with hot peppers can lead to a wild burning sensation in your hands. If you are sensitive to that sort of thing, wear some gloves. In general, you should wear gloves when handling peppers but hey, some of us are crazy and enjoy the burn.
Wash The Peppers
The first thing you are going to want to do is to wash the hot peppers thoroughly. A fermentation environment is ripe for creating mold and bad bacteria, washing removes these before they hit the ferment.
While washing, take a look at the quality of the peppers, if they are starting to rot throw them away. If there is any visible unpleasantness then you should toss them away. We only want the best peppers, you may need to buy an extra pack to ensure you get enough for your recipe.
Chop The Peppers
Now that your peppers are all clean and sparkly, it’s time to start the chopping. You’ll want to remove the stems, you can do this 1 of 2 ways.
Chopping the whole top off works well for thinner peppers like bird chili but creates a lot of waste with wider peppers like habaneros.
For the wider peppers, you can surgically trim around the stem to maximize the yield of the pepper. I just chop the tops off, it’s way faster and the loss in yield is minimal.
So now you have a bunch of topless peppers sitting on your cutting board.
Cutting Peppers Down To Size
If you are going to be mash fermenting, then you should prepare the peppers for the blender by chopping them into manageable sizes. When using a cheap blender like mine, the smaller the bits of pepper, the better.
If going with a brine ferment, it is really your choice, you can leave the peppers whole, quarter them, or chop them into rings. Cutting the hot peppers into rings takes a bit more time but can be worth it. It’s always nice to have a jar of habanero rings in the fridge.
Alright, by now you should have your peppers chopped and ready to go.
Note: I forgot to mention, that you can roast the peppers before chopping them up. Roasting can add flavour to the peppers that might be desirable for your hot sauce. The downside to roasting peppers before fermenting is that you could destroy the pre-existing microbes in the hot peppers. You may need to add some fresh peppers or something to kick start the fermentation process.
Step 3: Choose Your Addons
Hot peppers usually taste amazing on their own, but why not add some extra sensation. Fermenting your hot peppers with other ingredients like garlic or ginger will add flavour. The hot peppers will take on the flavour of the garlic or ginger during the fermentation.
You can use just about any fruit or vegetable to add flavour to a ferment. Blueberries, mango, asparagus, just about anything.
Prepare your addons in a similar way to the hot peppers. Wash them thoroughly and chop off anything that would taste bitter or undesirable. For example, if adding ginger, peel the ginger.
Step 4: Packing The Jars
Alright, let’s get the easy one out of the way.
Packing A Pepper Mash Ferment
When fermenting using a hot pepper mash, packing the jars is simple. Pour the mash from the blender into the fermentation jar.
Once the jar is full, tamp down the solids with a pestle or something flat and solid. Tamping should bring the liquid to the top of the mixture, fully submerging the solids. If the liquid did not cover the solids, you may have to add some brine to maintain an anaerobic environment.
Once all the solids are submerged, I will usually place a Ziploc bag filled with water over the brine to help further seal the environment.
Just like that, the jar of hot pepper mash is ready to ferment.
If you are using brine to ferment your peppers, you’ll want to pack the jar like this.
Packing A Brine Ferment
This part is also easy, I guess I could have started with either.
All you need to do for a brine ferment is pack the fermentation jar with the prepared hot peppers and add-ons. Once all the ingredients are in the jar, you will need to submerge them in an anaerobic environment.
Remember that salt brine we made earlier in the article? Time to put this to use.
Slowly pour the jar of brine into the jar with the prepared peppers. Give the brine time to seep into every nook and cranny. Pour enough brine to cover the peppers while also leaving about an inch of headroom in the jar. The headroom will give the liquid room to expand as the peppers release gas.
Once the peppers are submerged, you can add glass fermentation weights or a Ziploc bag to help keep the pepper under the brine.
With both methods of fermentation, all you need to remember is “below the brine, you’ll be just fine”.
Covering The Jar
Now that your solids are well below the brine and ready to become even more delicious, it’s time to cover the jar. If you are using a mason jar, then just loosely put the lid on, make sure air can escape. There are also airlock lids for jars that will automatically release gasses at pressure.
Either one of these options is fine.
But before you walk away from your fermentation, label your jars! It can be easy to forget what is what over the course of your ferments. The mixture could change colour or both might look similar. Labeling can help avoid any confusion when making your hot sauces.
Step 5: Fall In Love With Fermenting
Give it one day, and you will fall in love with fermenting. The smell of fermenting habaneros with some garlic and ginger is intoxicating. They smell so good.
You will want to smell them every day, but you should probably hold back. You don’t want to open the jars too much, you could introduce bad bacteria to the ferments.
Your recipe might call for 1 week of fermentation, or maybe even a month. It is also possible to ferment much longer, but the impact of the ferment diminishes after about 3 weeks.
3 weeks is when most of the Lacto-fermentation has been completed. Usually, it takes about this long to convert the sugars into lactic acid and CO2.
What Is The Best Temperature For Fermenting Hot Peppers
The optimal temperature for fermenting hot peppers is somewhere between 12C (55F) and 24C (75F). This is great news for many home fermenters as this is right around where most people have their room temperature set.
Hot pepper ferments benefit from the lower range of temperature. Lower temperatures extend the time needed to complete Lacto-fermentation. A longer fermentation period can lead to richer flavours and better-tasting ferments.
The hotter end of the temperature scale speeds up the fermentation process which doesn’t give the peppers enough time to develop the amazing flavour.
The best place to ferment hot peppers is on your countertop, out of direct sunlight.
When Are The Ferments Ready?
Now that your peppers are enjoying their anaerobic environment, how long will the fermentation process take?
As a rough estimate, you should let your peppers ferment for 2-3 weeks. If your house is warmer or you are heating your ferments, that time will be much shorter.
The best way to tell when your ferments are ready is to test the pH level. The pH level of your ferments should be under 4.6, this is the recommended limit. If you want to hit the standard for longer shelf life ferments, you should aim for a pH under 3.4.
Of course, tasting the peppers is also a great way to test whether or not the fermentation is complete. When taste testing, you want the peppers to taste acidic and a little “funky”. Usually, they will start tasting this way after a week, the longer they go the funkier they get.
What Happens If It Gets Moldy?
It is not uncommon for hot pepper ferments to go moldy. Especially if there are a lot of nooks and crannies for mold to grow in. If you use a Ziploc bag as a cartouche then you might be introducing a breeding ground for mold to grow.
Honestly, you could probably salvage the ferment if the top goes a tiny bit moldy. To be on the safe side it is best to toss, clean, and start over.
Mold will be green, black, or blue in colour and will appear fuzzy like a spiderweb. If there is a lot of it, definitely throw away your ferment. But if there is a tiny bit, you can just remove it and everything will be just fine.
Should the Brine be cloudy?
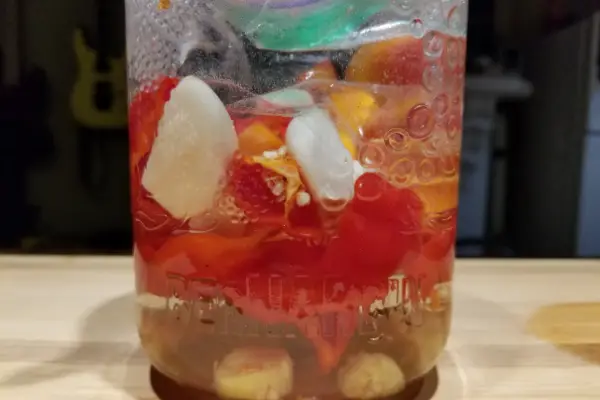
Yes, after a few days the brine will become cloudy, this is totally normal and a sign that the fermentation is working.
You might also notice a white cloudy substance sitting on top of the brine. This is called Kham yeast, it can look like mold but it is in fact a form of yeast.
For the most part, this yeast can be mixed in with the brine or removed. If there is a lot of it, you should remove it.
The best way to prevent mold and Kham yeast is to keep the lid on your ferments. Unfortunately, it is way too tempting to sneak tastes of the fermenting peppers. Try to do your best 🙂
What To Do With Fermented Peppers?
Well, the obvious next step is to make delicious hot sauce with your hot pepper ferments, so let’s explore that.
If you have fermented your peppers using brine, the first step should be to strain the solids from the brine. Whatever you do, make sure you save the brine. If you need to thin out your hot sauce the leftover brine works better than adding water.
You can now add the fermented peppers to a blender along with the other ingredients from the hot sauce recipe. Now blend, and you should have an amazingly delicious fermented hot sauce.
Fermenting pepper mash is a little easier. Add the mash to a blender or food processor, and add any extra ingredients. Then blend to the consistency the hot sauce requires.
If you like, you can also store the hot peppers in the fridge for snacking or garnish. The cool environment of the fridge will stop the fermentation process and preserve the current flavour of the peppers. I do this at least every 2 weeks.
How To Store Fermented Peppers
Speaking of storing fermented peppers…
If you aren’t going to make the hot sauce right away you’ll need to store the fermented peppers.
You can keep the jar on the countertop until you are ready to make hot sauce. Leaving the jar at room temperature might cause the flavour of the peppers to change. They could lose some of their funk so to speak.
Your best bet is to store them in the refrigerator until their date with the blender. The cool temperatures will stop the fermentation and preserve the current flavour of the fermented peppers.
Storing Fermented Hot Sauce
Once you have finished blending your fermented hot sauce you will need to store it. Thankfully, this process is super easy.
The absolute safest way to store your hot sauce is to heat up the sauce before bottling. This will kill any microbes that may try to keep the fermentation going. Don’t bring the hot sauce to a boil, just slightly bubbling. Be forewarned though, that heating up the hot sauce might change the flavour.
After heating, let the hot sauce cool down. Once cool, you can begin to bottle your hot sauce. Either in multiple small containers or in one mason jar.
Make sure you thoroughly clean your containers to help preserve the hot sauce and prevent mold. The containers should also have an air seal so no air can get in or escape.
Fill the containers with a funnel and place the cap on the bottle. The bottles of hot sauce should be stored in the refrigerator for maximum shelf life.
How Long Will Fermented Hot Sauce Last?
The shelf life of your hot sauce depends on a few factors: how long it was fermented, what the pH level is, and pasteurization.
Length of Fermentation
The length of fermentation relates to the pH level of your hot sauce. The longer you ferment, the more acidic the peppers will be.
pH Level
If you want your hot sauces to last a really long time then you should target a pH level of 3.4 or lower. This is standard for most commercial products.
Your hot peppers should be under 5pH from the fermentation process. To lower the acidity even further you can add vinegar to the hot sauce. Adding vinegar can change the taste of the hot sauce, so make sure to balance between taste and pH level.
Pasteurization
As mentioned above, heating up your hot sauce before storing can kill any microbes and bacteria that may promote mold growth.
Heating the sauce also stops fermentation but might change the flavour due to the heating. You will need to watch your temperatures to make sure you preserve the flavour of your hot sauce.
In general, fermented hot sauce should last anywhere from a couple of months to a couple of years. This depends on how well you followed the steps above.
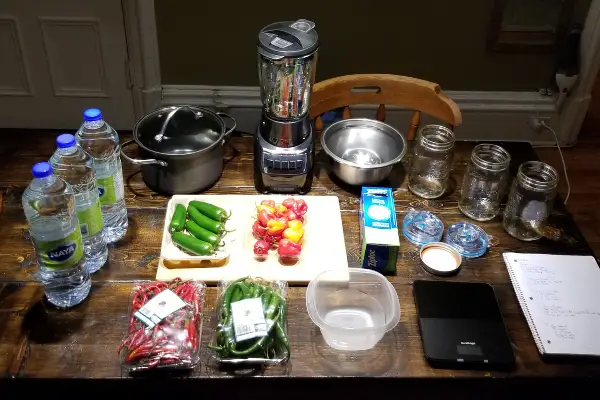
Tools for Fermenting Peppers
Now that you’ve learned how to ferment hot peppers, let’s take a look at some of the tools used in the process.
First, we will go over the basic tools for fermenting hot peppers like jars, lids, and weights.
Second, we’ll look at some other tools that can help make fermenting more fun and more accurate.
This post contains affiliate links to products. I may receive a commission for purchases made through these links.
-Thanks!
Essential Fermentation Tools
The following tools are essential to ferment hot peppers.
Fermentation Vessel – A suitable fermentation vessel is an absolute must. There are many types of fermentation vessels. Onggi pots are used often to make Kimchi. I use wide-mouth mason jars with an air lock. You can find different sizes of fermentation vessels as well. Larger vessels are great for making a lot of hot sauce.
Kosher Salt – You need salt to make your brine, I find Kosher Salt works best, just don’t use Iodized salt as it may kill the microbes responsible for fermentation.
Fermentation Weights – Remember the rule? Below the brine, you’ll be just fine. Fermentation weights help keep your solids submerged below the brine. This keeps them in an anaerobic environment which is pefect for fermentation.
Air-locks – Fermentation naturally releases CO2 so you will need a vessel that releases that gas. Otherwise, the pressure could build up and potentially crack your jar.
Storage Containers – mason jars, bottles,
Fermentation Kits – There are a few fermentation kits that come with just about everything you need for small-batch fermenting. Most of them come with airlocks or self-burping lids, fermentation weights, and sometimes jars.
Storage Jars and Bottles – Once your hot sauce is done, you’ll need somewhere to store it while you enjoy it. Mason jars are great for this if the hot sauce is for personal consumption. If you want to share your creation with friends you will need some smaller bottles to give out.
Other Helpful Fermentation Tools
Food Grade Gloves – Gloves can save your hands from the burn when handling hot peppers. It is also good practice to wear gloves when preparing food, especially if sharing with others. Make sure you get food-grade gloves, non-food-grade gloves can have a powder coating that you do not want mixing with your hot sauce.
Kitchen Funnel Set – Having the right sized funnel in your kitchen makes it really easy to fill your hot sauce bottles. No more spilling hot sauce on the side of the bottle, the funnel “funnels” it all into the bottle.
pH Strips and Testers – One of the most important factors in preserving your fermented hot sauce is the right pH level. You can test the pH of your hot sauce using test strips or a fancy handheld pH meter.
Silicone Lid Liners – Lid liners can help extend the life of your mason jar lids. Acidic foods like hot sauce and other ferments can eat away at the metal of the lid. These liners help prevent the lid from breaking down and also keep a good seal in your jar.
Tamper – A tamper can help push the solids under the brine. You can also use a tamper to make sure all of the air bubbles are pushed out of your mash.
Kitchen Scale – If you are tweaking recipes, it is a good idea to measure exactly what you put into your hot sauce. Kitchen scales also come in handy for getting the salt concentration in your brines.
Seedling Heat Pad – A seedling heat pad with temperature control can help you dial in the best temperature for your pepper ferments. Just place your fermentation vessel on the mat and set the temperature.
Strainers – A strainer is good to have at the end of your ferment if you need to separate the brine from the peppers. Straining the peppers out makes it easy to save some brine to thin out your hot sauce.
Fermented Mango Habanero Hot Sauce Recipe
Who doesn’t love mangoes? Add some fruity Habanero heat and you’ve got a deliciously sweet hot sauce ready for any meal. That is what this recipe is all about, mangoes, habanero, and teaching you to ferment hot sauce.
This is a great introduction to fermenting a mash. Your first step will be to blend the ingredients together into a chunky mash. Then you’ll ferment that in a jar for a week. Just remember, under the brine, you’ll be just fine.
Fermented Mango Habanero Hot Sauce Recipe
Course: Fermenting, Hot Peppers, Preserve Hot Peppers4
servings30
minutes1-2
WeekIngredients
100g of Habanero Peppers
2 Fresh Mangoes
2 Inch Fresh Ginger
2 Cloves of Garlic
2 tsp of Sea Salt
1/4 cup White Vinegar
Directions
- Wash all of your ingredients and chop the top off the Habaneros. Cut them into quarters.
- Peel the ginger and cut it into 4-6 pieces. Peel and crush the garlic cloves.
- Peel the mango and cut it into chunks (to make it easier on the blender).
- Add the habanero, garlic, ginger, salt, and mango to the blender. Blend until smooth or slightly chunky.
- Pour the mixture into a fermenting jar and ferment for 1 week.
- After 1 week, add the fermented mixture to a blender with the vinegar. Blend until really smooth, can add a bit more vinegar, just watch taste.
- Bottle the hot sauce and enjoy!
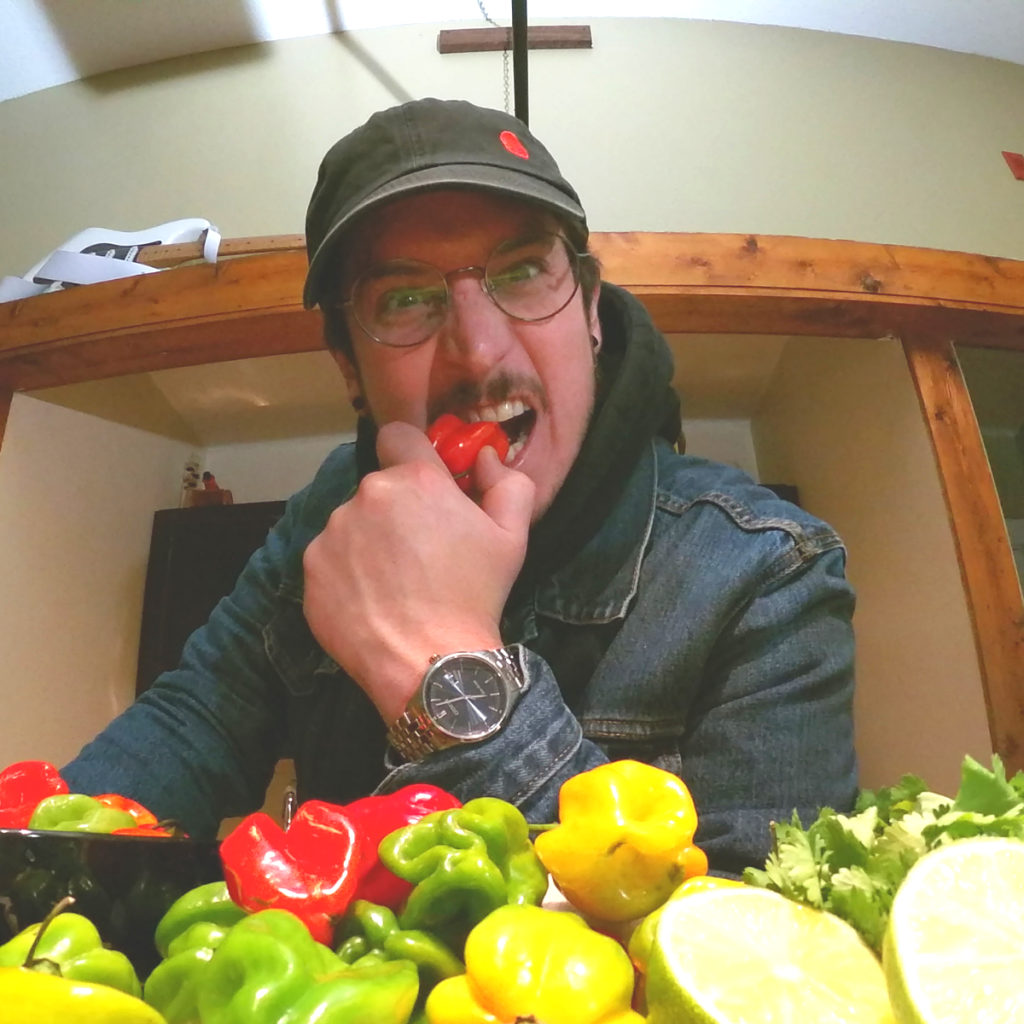
Mike P
Welcome to The Hot Sauce Guy! I’m Mike, your guide to the spicy world of hot sauces and the creator of Spicy Riffs Hot Sauce. From Canada, I share the hottest reviews, pepper-growing tips, and sauce recipes with a touch of rock and roll.
My passion? Crafting the perfect blend of heat and flavor. Whether you’re here for the fire or the flair, get ready for a journey into the world of spicy delights.
Let’s turn up the heat together!
About Us